
Activity 5
Introduction
Why is white light "white"? What does it mean for something to be colored white? Can we "take apart" white light and put it back together again? These are some of the questions asked by Isaac Newton back in the 1680's, for which he found many interesting answers. In this Activity, you'll get to explore some of the same properties of light he examined and perform some of his classical light experiments.
Lab One
The is carried out using the Lab One Module, A-8, Spectrometers.
Home Activity OPTIONAL
Procedure
- Gather these items from your Optics Kit:
- diffraction grating (clear slide thing)
- red and blue filter
- Gather these items from your home or office:
- piece of white paper
- two razor blades
- a shoebox or other small box
- tape
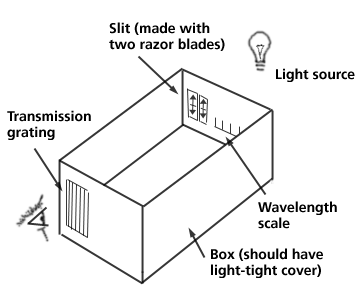
- Make your own spectrometer
(Taken from page 324 of "Seeing the Light" by D.S. Falk, D.R. Brill,
and D.G. Stark, John Wiley and Sons, 1986))
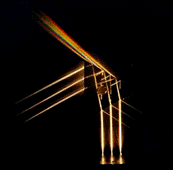
A number of common items can be used as diffraction gratings. You can look at the light from a small bright light source reflected by the grooves in an LP record. Depending on the tilt of the record you will see the light source's component colors, provided the source is small or distant enough.
You can use the diffraction grating in your Optics Kit or purchase replica gratings cheaply -- as "spectrum glasses" in novelty stores (coarse gratings) or from scientific supply houses. For a bit more you can purchase gratings made to be used as camera "filters" for special effects, such as rainbow (line grating) and crostar (square grating) filters. The scientific filters specify the grating constant by telling you that the grating has, say, 13,400 lines/inch. (So in this case d = 1/13,400 in = 2.54/13,400 cm = 0.0002 cm = 2,000 nm.) Other types should be calibrated using a known wavelength, such as the strong blue line of mercury, which has
 = 426 nm. If you do not have a mercury
lamp (sun lamp) you can see this line in a black light or as a brighter
line againsta continuous background in the light from a fluorescent
tube. You can get precision spectra if you mount your grating so that
it is illuminated by a narrow slit and stray light is excluded.
= 426 nm. If you do not have a mercury
lamp (sun lamp) you can see this line in a black light or as a brighter
line againsta continuous background in the light from a fluorescent
tube. You can get precision spectra if you mount your grating so that
it is illuminated by a narrow slit and stray light is excluded.
Interesting spectra to observe are those of a light bulb, of fluorescent lights, of black lights, of sodium lights used for highway illumination, and of "neon" lights used in bars. Also note the effect of colored filters or of a glass of colored liquid held in the light beam.
Build the spectrometer shown in the diagram above. The slit made by the razor blades should be very thin (less than a few millimeters across) and your box should be relatively light-tight. Be sure to mount the diffraction grating so that the spectral lines are seen vertically.
- Calibrate your spectrometer.
a) Use a ruler to draw a wavelength scale along the bottom right-hand side of the back of your spectrometer box (see diagram above). Make sure the spacings are equal.
b) Look at a fluorescent bulb (in the ceilings of most office/academic buildings) with your spectrometer. A line spectrum should appear on the right-hand side as you look through the grating: a bright green line superimposed on a fainter continuous spectrum. This bright green line is a mercury line at 546 nm. Mark this point on your wavelength scale, and label the rest of your scale, with the longer wavelengths (lower energy -- red) on the right side and shorter wavelengths (higher energy -- blue) on the left side. The bluest line you will see (indigo) is at a wavelength of about 400 nm, and the reddest line you will see (red) is at a wavelength of about 700 nm.
To read more about the spectrum, prisms, and gratings, go to the Readings on Color and Light.
Page authored by the ACEPT W3 Group
Department of Physics and Astronomy, Arizona State University, Tempe, AZ 85287-1504
Copyright © 1995-2000 Arizona Board of Regents. All rights reserved.