EQUIPMENT: Lenses A, B, and C, Meter Stick (or Ruler), and White Card
|
|
| DESCRIBE THE IMAGE
|
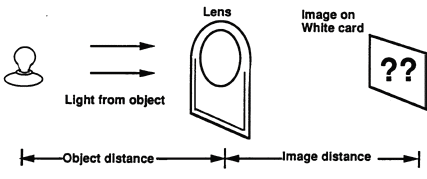
DESCRIBE THE IMAGE - In a dimly lit room find the image formed by lens A of some bright object which is at least a meter (several feet) away
from the lens (your teacher will suggest what object to use). The IMAGE
(a picture of the object) will appear on the white card when you hold the
card at the proper distance from the lens. Move the card closer to and
farther from the lens until you get a sharp (FOCUSED) image of the
object.
1) Describe the image which you have found. Be sure to note any
differences between the image and the object. Repeat the steps above
using lens B and then lens C.
2) Describe any differences from the results you got for lens. |
|
| STUDY IMAGE
LOCATION |
Using lens A, make the distance from the lens to the object less by gradually moving the lens toward the object. Keep checking the image as you do this by moving the white card.
3) What effect does this have on the image size and location?
|
|
| FIND THE FOCAL LENGTH
|
When an image is formed of an object which is very far from a lens, the image is located approximately at the FOCAL POINT of the lens. The distance from the center of the lens to the focal point is called the FOCAL LENGTH of the lens.
4) Find the focal length of lens A as well as lens B.
|
|
HOW IS THIS USEFUL?
|
Cameras use lenses to focus images on film. Film strip and movie projectors have movable lenses that can form a sharp image on the screen. Your eye is a lens. The image on the back of your eye is upside down, but your brain interprets it as right side up.
|
