Culturing
queens and colonies in the ant genus Pogonomyrmex
Robert A. Johnson
School of Life Sciences
Arizona State University
Tempe, AZ 85287-1501
e-mail:Robert.johnson4@.asu.edu
Photos by Dale Ward
Ants in the genus Pogonomyrmex
are widespread and common in North America, and the queens are numerous and
easily caught following their mating flight (see below). Successful culture of a Pogonomyrmex
colony is also enhanced by the fact that the queens are both sturdy and
hardy. Species of Pogonomyrmex
do well under non-rigorous conditions, and the several species that I have
reared in research experiments have a fairly general set of requirements. My experiments often involved rearing
hundreds of queens with the express intent of examining patterns of survival
and brood production across various conditions (especially moisture), thus
providing information on general conditions and care of colonies. This note details one of the more successful
and visually rewarding methods for starting with a queen and successfully
rearing a colony of Pogonomyrmex. I also provide scattered natural history
anecdotes for several species.
Finding Queens
Newly
mated queens of Pogonomyrmex are numerous and
easy to find following their mating flight.
Summer rains trigger the mating flights for
most species of Pogonomyrmex, and the queens
can be excavated from their incipient nest for the next several days. However, it becomes progressively more
difficult to excavate queens beyond this time frame. A few species of Pogonomyrmex
have mating flights in late spring (P. californicus)
or in response to winter rains (P. subdentatus
and possibly P. brevispinosus). As mentioned below, the queens of P. californicus are obligate foragers, and they can be
found foraging on the ground during mornings and afternoons for 1-2 weeks
following their mating flight.
Newly mated queens of Pogonomyrmex
construct a fairly typical tumulus nest that guides you to the location to dig
for your queen. The queen is rarely
deeper than 12" in the first few days of the founding stage. Various sources of mortality quickly begin to
kill these queens, so you will typically need to dig up several incipient nests
for each queen that you find. Queens of Myrmecocystus also have mating flights triggered by
rain, and queens of both genera can often be found at the same time (though Myrmecocystus queens are typically less
common). With practice, you can learn to
differentiate between founding nests of Myrmecocystus
and Pogonomyrmex.
Nests Design for Newly Mated Queens
Several nest types can be used - water tubes or 8-16 oz. glass bottles filled with sieved soil work well. However, my preference is to use an easily constructed glass ant farm that facilitates observing both the architecture of the nest and the behavior of the queen and workers. This glass ant farm can be constructed in several minutes and costs about $3.00 per nest. Parts for the nest include two plates of glass (6" x 8"), wood molding (about 25" of ¼" x ¾"), and four 1” binder clips. Cut the molding into two 6" and two 6½" pieces. Soil can be obtained from anywhere, but it is best if it contains a moderate amount of clay (sand dries much faster). The soil should be sieved to remove gravel and larger particles (use a colander, strainer, or similar device if you do not have a sieve). Place the bottom and side pieces of molding flush to the edges of one of the glass plates, place the other glass plate on the molding to form the nest, attach the binder clips, and pour in the sieved soil leaving about a ½" space below the top piece of molding. This space provides room for the dirt that the queen will excavate and also makes it more difficult for her to escape through any gaps (see Photo 1 at bottom). Postal or packaging tape can be used to hold the nest together instead of binder clips.
Pour enough water into the nest to wet the
entire soil column. It is best to do
this slowly so that there is not a great excess of water (though this will
eventually drain through the molding).
Wetting functions to hold the soil together once the queen starts to
excavate her nest, and also provides the moist environment that Pogonomyrmex queens need to successfully found their
nests (see below). It is also helpful to
use a pencil or similar object to create a depression/small hole in the
soil. Due to negative phototaxis, the queen will typically move into this
depression and later start to excavate her nest at the base of the hole. You can now place the queen in nest, place
the top piece of molding on the ant farm, attach the binder clip, and wait for
the queen to excavate her nest. Be
patient as it may take several days before the queen starts to excavate her
nest. She should start to lay eggs
within 1-2 days of excavating her nest chambers.
Note that under ideal conditions (see
below), you will probably get about 60-70% of the
queens surviving to the stage of producing their first workers. Queen mortality will continue at a low level
until the colony is several months old.
Temperature and Moisture
Species
of Pogonomyrmex do best at warm temperatures,
with most species doing best when they are maintained at 30oC or
higher. I generally keep colonies in an
incubator at 35oC, but even temperatures up to about 40oC
are fine. Speed of brood development and
colony growth rate depend on temperature, with both happening faster at higher
temperatures. For example, the first
workers from a single queen will typically emerge after 3-4 weeks at 30oC
but this time may double if the temperature is dropped to 25oC. Given that most people do not have access to incubators, an alternative for keeping the colony warm is to
place a rectangular reptile warmer on the back of the nest.
Water evaporates from these nests fairly
slowly, but you will still probably need to water the nests every 1-2
weeks. Moisture is very important during
the queen founding stage, with queen survival, queen mass, and number of brood
produced all being higher when the soil is moderately to very wet. You can often look at the soil to determine
if it is wet. Alternatively, soil
moisture can be gauged by adding a little water to the nest - if the water
darkens the soil appreciably, then water needs to be added until a moderate
portion of the soil column is moistened (see Photo 2). Note, however, that the water can quickly run
down the galleries to the bottom of the nest and can temporarily submerge the
queen and brood. This can be avoided by
adding the water to an area away from the nest entrance and letting it slowly
infiltrate into the soil. Once the first
workers emerge, the nest should be kept a little drier than during the founding
stage (moist but not wet) in order to keep the stored seeds from rotting and/or
germinating.
Food
The
queens of many species of ants are fully claustral,
meaning that the queen excavates her nest and maintains herself and rears her
first brood solely using body reserves; these reserves include fat, storage
proteins, and histolysis of the wing muscles.
Thus, rearing the first brood is energetically expensive for the queen,
and she often loses >50% of her intitial body mass
during the founding stage. These fully claustral queens do not need any food until the first
workers emerge.
Several species of Pogonomyrmex
are fully claustral (e.g., P. barbatus,
P. rugosus, P. maricopa), and thus the queens of these species
should not be fed. However, the genus Pogonomyrmex contains several species in which the
queen forages during the founding stage.
This unusual behavior (for the subfamily Myrmicinae)
can be obligate such as in P. californicus or
facultative such as in P. occidentalis. For obligate foraging queens, food must be
provided if the queen is to survive and produce brood. In contrast, facultative foraging queens can
survive and produce brood without food, but they will produce a higher number
of brood if food is available – and a higher number of first brood is the first
step to getting the colony past the early most vulnerable stages of the colony
cycle. Foraging queens also lose much
less mass during the founding period, lessening their chance of dying from
energy depletion near the end of the founding stage. Data are lacking on queen foraging for
species other than those mentioned above, so queens of other species should be
observed for this unusual behavior. The
general pattern to date seems to be that queen foraging is associated with
small queen body size compared to that of fully claustral
congeners.
Queen foraging is easily observed in these
glass ant farms. Within a couple of days
of excavating her nest chambers, the queen (if she forages) will start to spend
a fair amount of time on the surface of the nest. Dropping a few seeds into the nest while the
queen is on the surface will quickly result in her harvesting a seed and taking
it into one of her nest chambers. Such
queen foraging is also somewhat common in the attines
(leaf-cutter ants); in this case, however, the queens are collecting substrate
for their fungus garden.
Kentucky blue grass seeds provide an
excellent diet for Pogonomyrmex queens (for
species in which the queen forages) and colonies with few workers because the
seeds are small, highly palatable, nutritious, and non-toxic. The seeds of most grass species should
provide a good diet for seed-harvester ants because grass seeds typically lack
toxic secondary chemicals. When buying grass seeds for your ants, be careful to ensure that
the seeds have not been treated with toxic fungicides that typically give the
seeds a pinkish tint. Colonies do
exceptionally well if you also add small bugs, such as flies, crickets, etc.
and/or a small piece of fruit. These
additional food items speed colony growth and production of sexuals. In a few cases, we have had sexual brood
produced within 1-2 years, but longer times and additional space are needed if
the colony is to grow beyond the first few brood cycles. The colony can remain in the 6” x 8” ant farm
for several months, but colony growth will be arrested if you do not transfer
it to a larger nest.
Transferring Your Colony to a Larger Nest
Within
a few months, the colony should grow to the point that it needs to be
transferred to a larger nest. There are
several designs for larger nests, but keeping the same nest design in a larger
format facilitates your ability to watch the underground activities and
behaviors of your colony. The size of
the nest is flexible, but 12" x 18" is a good minimum size to provide
ample room for a good period of time (Photo 2).
Additional space is provided by widening the nest using ½" x
¾" wood molding. Once you have
decided on the size of your new nest, obtain the two pieces of glass (note that
the glass needs to be thicker if you have very large nests), cut appropriate
lengths of ½" x ¾" wood molding (the nest is ½" wide), attach
the binder clips to the frame (you will need 2" binder clips for this
larger frame), and add water. It can
take a couple of hours for the water to infiltrate into deep nests.
Open the small nest with the incipient
colony by removing the binder clips and pulling off one of the pieces of
glass. Aspirate the queen, workers, and
brood, then pour them into the top of the larger nest – you can place the
colony in the refrigerator for a short time if you want to slow them down before
they are aspirated. The colony will
quickly dig numerous chambers in their new home, and the queen will hopefully
begin to lay many eggs.
You can place seeds on the soil surface or
a foraging arena can be provided. The
foraging arena can consist of a small plastic box with a lid, which you can
open to provide food, etc. Flexible
plastic tubing (¼" inside diameters works fine) is used to connect the
foraging arena to the top or side of the nest.
Make sure that the tubing fits snugly into both the foraging arena and
nest or you will have an escape.
Harvested seeds and brood will be stored throughout the nest (see Photos
3-4).
An alternative nest type involves creating
your own design using modeling clay and plaster of paris
or hydrostone (see photos). Roll the modeling clay into strips and place
them against one of the glass plates to form what will become the tunnels and
chambers of the nest. Take care to
ensure that the angles are shallow enough to allow the ants to move vertically
through the nest. Make sure that the
clay tunnels are only about ¼" wide because the plaster/hydrostone needs to form a continuous layer of support
throughout the back of the nest. Place
the glass plate holding the modeling clay on a flat surface. Apply several drops of water-soluble glue,
such as Elmer’s, to one side of the molding, then place the wood molding
spacers around the edge of the glass plate with the modeling clay. Allow the glue to dry to the point that the
wood molding is firmly attached to the glass.
You can color your nest, as desired, by adding stucco coloring to the
plaster/hydrostone prior to adding water. Mix water into the plaster/hydrostone, and pour the mixture onto the glass plate. While the mixture is still a liquid, remove
excess plaster/hydrostone by running another piece of
molding across the entire surface of the nest so that the plaster/hydrostone is flush with the molding. Place the second piece of glass over the
nest, attach the binder clips, and let the plaster/hydrostone
set for several hours. Remove the binder
clips, then gently pull off the top piece of
glass. Pour water onto the edge of the
nest and the wood molding. After a
period of time, the glue seal will dissolve and you can remove the pieces of
wood molding. At this point, put the
second glass plate on the back of the nest, then flip the nest over (the second
piece of glass now supports the plaster/hydrostone
nest), and pull out the modeling clay (which can be reused to construct tunnels
in another nest). The spaces left by the
modeling clay now form the tunnels and chambers for your ant colony. Put the glass plates over the nest and attach
the binder clips (the wood molding is now optional on this nest). More intricate designs with numerous tunnels
provide additional space for your colony within the same size nest frame (see
Photos 5-6).
Note that plaster/hydrostone
nests need little water to maintain their moisture. You can add water occasionally and/or water
can be provided via test tubes plugged with cotton that are placed in the
foraging arena.
As the colony grows, you can build
additional nests of whatever size you like.
Use flexible plastic tubing to connect the nests so that the workers can
move freely among the nests.
Final Notes
Many species of ants, with the exception of those that
have specialized life histories (i.e., army ants), are fairly easy to raise and
maintain in captivity, but it does take practice and experimentation to learn
the most suitable conditions for each species.
The nest design and colony care detailed herein can be used for many
species of ants, given the caveat of species-specific requirements for food and
temperature. For example, we have
discovered that several species of desert ants, e.g. Forelius
sp., do not produce brood when the temperature is maintained below 30oC. Thus, you need to be willing to experiment
with your colony if they are producing few brood or
seem to be doing otherwise poorly so that you can determine conditions that are
best suited to your species.
The photographs referenced above and additional
photos of laboratory nests are posted at http://www.tightloop.com/bob/
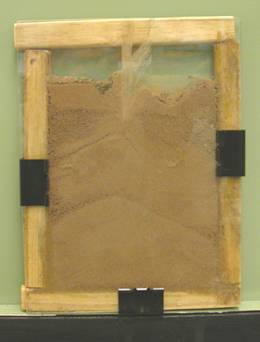
Photo 1. Photograph of a
6" x 8" glass ant farm filled with soil for rearing your queen.
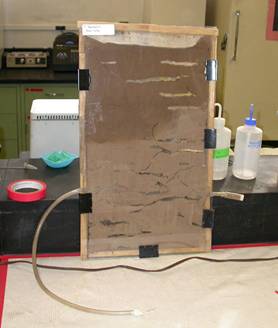
Photo 2. Photograph of a Pogonomyrmex barbatus
colony in a 12" x 18" glass ant farm filled with soil. Close-up photos of nest chambers, granaries,
queen, and brood are shown below (photos 5-6).
Notice the recently watered darker soil at the top of the nest.
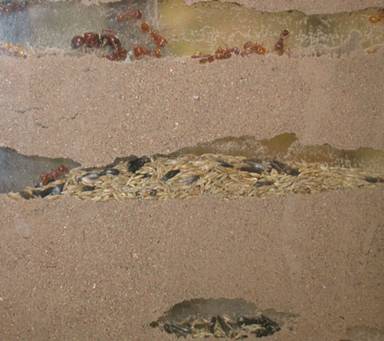
Photo 3. Close-up photo of a Pogonomyrmex
barbatus colony in a 12" x 18" soil ant
farm showing nest chambers, granaries, queen, workers and brood.
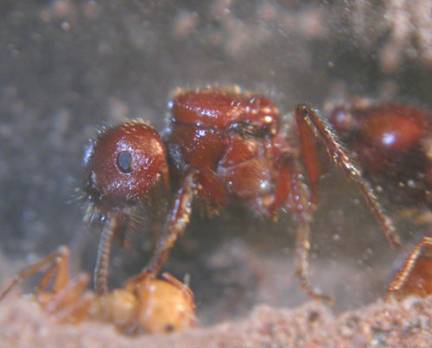
Photo 4. Close-up photo of a chamber in the 12" x
18" ant nest showing a Pogonomyrmex barbatus queen with an eclosing
callow.
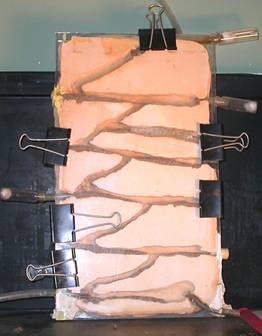
Photo 5. Photograph of a
simplified tunnel design for a plaster nest.
Notice placement of tubing and vials in the sides of the nest. These tubing can be used for access to
provide food and/or water or to connect additional nests. The colony will also place brood in the
vials.
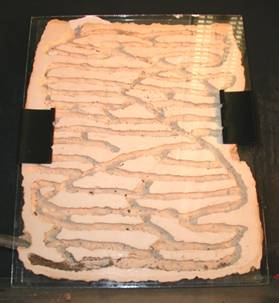
Photo 6. Photograph of a
more intricate plaster nest. The large
number of tunnels maximizes the amount of nest space available to a
colony. The flexible plastic tube
inserted near the bottom of this nest could lead to a foraging arena or to
another plaster nest. Note the shallow
angles of the tunnels which allow for easy vertical movement of the ants.