|
Using Grids for Scale Translation
If you want to translate an image to a a different scale, a grid can be a useful tool.
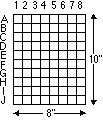
Sample Problem: Blow up this image by a factor of four (4x). (Imagine the image as being 10" vertically x 8" horizontally)
1) On a piece of clear acetate (at least 8 x 10 inches), create a grid of evenly spaced (1 ") horizontal and vertical ruled lines. Use a "Sharpie" or similar permanent marker. Label each division of the horizontal (X) axis across the top with numbers 1 through 8. Label each division of the vertical axis (Z) with letters (A through J).
2) Overlay the gridded acetate over your original artwork. Secure with drafting tape. You will quickly see that the major features of the image will correspond to "locations" (defined by their relationship to the X and Y axes) that fall on or near lines of the grid.
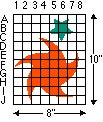
3) Using an "erasable marker" (so you can reuse your grid), trace the major outlines and features of the artwork onto the acetate. Make "tick marks" where your lines cross the lines of the grid.
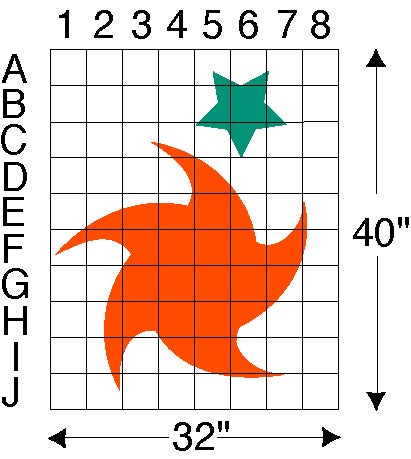
4) Now create a light grid in pencil on the canvas or surface of your blow-up. We know you want the image to be 4 times its original size. You would make a grid on your canvas 4x the size of your acetate grid--that is, 40 inches high and 32 inches wide. Each subdivision of the grid would be 4 " across.
5) Carefully translate the "tick marks" from your acetate grid to the grid on the new artwork. By estimating relative distances, you can get a very accuate translation. For example, if a tick mark on the original (let's say the upper left point of the green star) is "about in the center of square A5," you would place a tick mark on the blow-up about in the center of A5.
6) Faithful adherence to the original will ensure an accurate
scale translation. Once you have located all the points of intersection,
you simply need to connect the dots. You might do this freehand...establishing
appropriate curvatures etc. by referencing to the original. If
you need more "resolution" in the larger drawing, go back to your
acetate grid and add a set of subdivisions at 1/2" intervals.
Following the rule that what ever you do at one scale, you must
do at the other, you would add a set of lines at 2" intervals
on your larger artwork. Note: You needn't do this over the entire
image. You may only need extra reference lines in areas of great
detail--a face for example. You could have a small section of
the original that had a very fine grid--say 1/4" intervals (which
would be 1" intervals on the scaled up artwork).