 Benjamin Cheverton's reducing machine from 1826.
Shifting Between Scales in 3D
Artists and designers have a number of methods available to them for scaling an object "up or down." Traditional methods include hand-held calipers, elaborate "pointing systems," and 2D patterns. More high-tech methods include point digitizers and 3D laser scanners.
Calipers
Calipers afford the artist a quick, low-tech method for establishing relationships between objects of different scales. First, calipers are used to measure the distance between key measurements (e.g., the distance between the eyes, the width of the head at the temples, etc.). Next, these measurements are laid against a ruler to give a precise numerical value. If the copy is to be an enlargement of the original, one need only to multiply the original measurement by the appropriate factor. For example, say you wanted to make a new head four times (4x) the size of your original. If the distance between the eyes on the original sculpture was 4 inches, the distance between the eyes on the enlarged copy would be 16 inches. The artist would continue taking as many measurements necessary to ensure accurate scaling from the original to the copy.
Pointing Systems
Traditionally, artists would produce small "maquettes" or models which were used as an aid to scaling. A variety of "pointing systems" were developed to facilitate accurate translation.
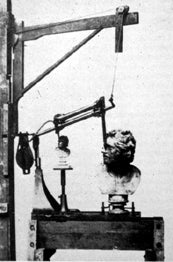
Benjamin Cheverton's reducing machine from 1826.
By using a pantographic arm or similar device, the artist could quickly establish shared reference points between a source object and its copy. In Cheverton's system pictured above,the source object is the full scale portrait. The copy is the smaller, approximately "half-scale" head.
Using 2D Patterns for Scale Translation in 3D
Evaluate the surface contours of your object. Could you imagine "peeling" one of your objects--like an orange--and flattening its "skin" into a two-dimensional shape? If so, you can use this 2D shape as a pattern to reduce or enlarge your object. One way to get produce this flat version of your object is to literally wrap the object with thin, flexible paper (dress pattern material is good), then cut the paper off along major lines of division such as edges or prominent contours.
To translate this "flattened" object to a a different scale, a
grid can be a useful tool. The following steps will get you started:
1) Create a grid of evenly spaced horizontal and vertical ruled
lines. The interval will depend on your the size of your flattened
shape. (Use a small enough spacing to capture the key details
of your shape). Label each division of the horizontal (X) axis
and vertical axis (Z).
2) Lay the pattern on top of the grid. Secure with drafting tape.
You will quickly see that the major features of the image will
correspond to "locations" (defined by their relationship to the
X and Y axes) that fall on or near lines of the grid.
3) Trace the major outlines and features of the artwork onto the
grid. Make "tick marks" where your lines cross the lines of the
grid.
4) Now create a light grid in pencil on the corresponding surface to be used for your copy. If you know you want the image to be 4 times its original size, you would make a grid on your canvas 4x the size of your grid. Each subdivision of the grid would be 4 " across.
5) Carefully translate the "tick marks" from your grid to the grid on the new artwork. By estimating relative distances, you can get a very accurate translation.
6) Faithful adherence to the original will ensure an accurate scale translation. Once you have located all the points of intersection, you simply need to connect the dots. You might do this freehand...establishing appropriate curvatures etc. by referencing to the original. If you need more "resolution" in the larger drawing, go back to your grid and add a set of subdivisions at smaller intervals. Following the rule that what ever you do at one scale, you must do at the other, you would add a set of lines on your larger artwork. Note: You needn't do this over the entire image. You may only need extra reference lines in areas of great detail--a face for example. You could have a small section of the original that had a very fine grid--say 1/4" intervals (which would be 1" intervals on the scaled up artwork).
Return to 3D Unit V: Scale and Context