Appreciating Hubble at Hyper-speed: Online Manual
Welcome to the online user manual for the Appreciating Hubble at Hyper-speed visualization tool. For help on a specific topic, select it from the list below. Otherwise, scroll down to start from the beginning.
- System Requirements
- Installing and Running the Application
- Main Screen and User Interface
- Moving the Camera
- Hotkeys and Special Functions
- Changing Options and Settings
- Configuration File and Advanced Options
- License, Source Code, and Modifications
System Requirements
The following are the minimum system requirements to run the Appreciating Hubble at Hyper-speed application:
- Microsoft Windows, Mac OS, or *nix operating system with Sun Java runtime version 1.4.3 or later
- 1.0 GHz processor
- 256 MB RAM
- Mouse and Keyboard
We recommend the following for optimal system performance:
- 2.0 GHz dual-core processor
- 1.0 GB RAM
- Graphics accelerator card with 64 MB video RAM
Additionally, an internet connection is required if you wish to view extended information about selected galaxies.
Back to IndexInstalling and Running the Application
The Appreciating Hubble at Hyper-speed application is distributed as an
archive containing a standard executable Java resource file. To install
the application, simply download the
archive file for your operating system and save it wherever you prefer.
Extract the archive wherever you like and then double-click the ahah.jar
file to run the program. If you prefer to run from the command line, use
java -jar ahah.jar.
Also provided is a configuration file, ahah.conf, that
provides several options that you may modify if you want to use custom
settings every time you run the program. See the
Configuration File section for more
information.
Main Screen and User Interface
The main screen represents your primary interface with the application. Besides holding the actual visualization, the screen also provides various forms of information about the simulation and methods to interact with and gain more information about specific galaxies.

The numbered user interface elements are as follows:
- Position Indicator, showing the camera's x and y position within the coordinate system, as well as the camera's redshift.
- Active Geometry Indicator, showing whether the Universe's real geometry is active or a non-physical geometry in which angular sizes are unaffected by the Universe's expansion.
- Info Box that shows more information about the selected galaxy, including its HUDF ID, redshift, and comoving radial distance.
- Jump Dialog, where you may enter an Object ID or redshift on which to center the camera.
- Speed Indicator. Used to remind you that the speeds represented in the application (when moving) are not physically attainable.
Moving the Camera
You may move the camera using either the mouse or keyboard, or with a combination of both. We recommend that most users navigate with the mouse, though advanced users may find the precision movement afforded by the keyboard useful in some situations.
To navigate using the mouse, simply click and hold the left mouse button anywhere within the Main Screen. Moving the mouse will then move the camera left, right, up, and down. To move forward and backward, either scroll the mouse wheel up and down, or click and hold the mouse wheel or middle mouse button, then move the mouse forward and backward. You may also move forward and backward by holding shift while clicking and holding the left mouse button.
To navigate using the keyboard, simply use the arrow keys to move left, right, up, and down. To move forward and backward, hold shift and use the up and down arrow keys. Holding control while using keyboard navigation will move the camera at 10x the normal speed.
In addition to direct navigation, you may double left-click on any galaxy to initiate an automatic move to it. This will move the camera at a moderate pace along the line (geodesic) between the camera and the galaxy. The automatic move can be cancelled at any time by performing most other actions, such as attempting to move the camera or selecting a galaxy. Note that toggling the spatial geometry mode will not cancel an automatic movement.
Back to IndexHotkeys and Special Functions
The application contains a number of additional features besides moving the camera, most of which are accessed using hotkeys. The following table contains an overview of these additional features and their hotkeys:
| Program Feature | Hotkey |
| Select a galaxy and open its Info Box | Left-click galaxy |
| Toggle spatial geometry mode | G |
| Open Jump Dialog to travel to a specific galaxy or redshift | J |
| Reset the simulation and move the camera to the origin | R or F5 |
| Open the Help and Options Dialog | H or F1 |
Info Box
The Info Box contains various information about the selected galaxy:
- The Object ID is a number uniquely identifying each galaxy and can be used in conjunction with the Jump Dialog to direct another user to a specific galaxy.
- The Redshift represents the factor by which a galaxy's observed spectrum is shifted from what we would observe if it were nearby. It is this measurement that allows us to calculate distances to galaxies.
- The Comoving Radial Distance represents the spatial separation of the galaxy from the origin at the present epoch, assuming zero peculiar velocity with respect to our own galaxy. It is calculated using the currently active cosmology constants.
- The Stamp Size is the length of one side of the black box surrounding the galaxy's picture. Thus if a galaxy takes up roughly half the width of the box and has a stamp size of 30 kpc, its proper transverse diameter should be about 15 kpc.
- The More Information Link links to a web page containing additional data for the selected galaxy. This includes its position (RA and Dec) and spectral fitting data. Note that not all galaxies have this additional information available. Specifically, it is available only for those galaxies that were included in the GRAPES survey, which are most of the bright, large galaxies.
- The Jump Button moves the camera to a view centered on the selected galaxy, exactly as if the galaxy's ID number had been entered into the Jump Dialog.

Spatial Geometry Mode
Toggling the spatial geometry mode changes between the Universe's actual geometry and a geometry where angular sizes are unaffected by the expansion of the Universe. This second geometry does not have a physical analogue - it does not represent what the Universe would look like if it were not expanding, or any other such set of circumstances. Instead, it is provided simply to convey visually that observed angular sizes have been affected by the scale factor.
Jump Dialog
The Jump Dialog is a way to quickly move to a specific location. If you enter an Object ID number then the simulation will move the camera to a position centered on that object. This is useful for labs that require students to examine a number of specific galaxies. If no Object ID is entered then the simulation will move the camera to the specified redshift, leaving the x and y coordinates fixed.
Resetting
Using the reset function will reset the simulation, exactly as if the application had been newly opened. This includes reloading all galaxies - both images and position data - as well as recalculating all distances and moving the camera to the origin. It also resets the graphics rendering thread, so may be used in the event that images fail to update.
Help and Options Dialog
The Help and Options Dialog gives you basic information about running the application, such as movement controls, as well as allowing you to modify some of the simulation's configuration parameters at runtime. It is discussed in detail in the next section. Additionally, the license for the software is also provided in this dialog.
Back to Index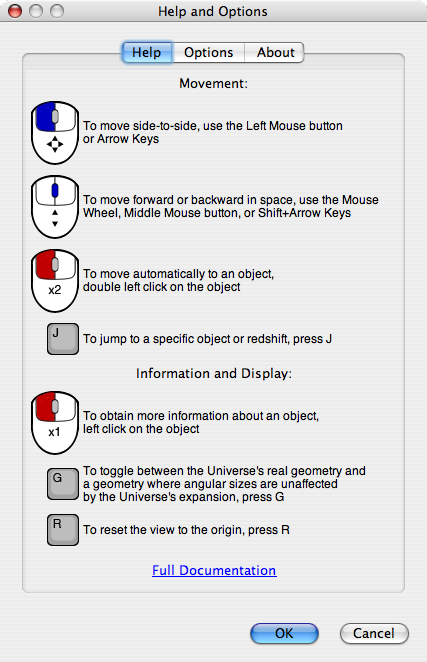
Changing Options and Settings
There are two primary ways of changing options and settings for the application. These are the Configuration File, which will be covered in the next section, and the options pane of the Help and Options Dialog. The options pane contains two primary sections, Cosmology Parameters and Program Performance.
Cosmology Parameters
The Cosmology Parameters section allows you to modify certain constants of the displayed cosmology. There are currently four parameters that may be modified at runtime:
- H0 is the Hubble Constant, which goes into Hubble's Law relating recessional velocity and distance. It is also used when obtaining proper distances from coordinate distances within the application. Its units are km/s/Mpc.
- ΩM is the matter density parameter of the Universe. It represents what fraction of the total energy density of the Universe is attributable to matter, both baryonic and dark.
- ΩΛ is the so-called vacuum energy density parameter of the Universe. It represents what fraction of the total energy density of the Universe is attributable to dark energy, ie. expansion energy associated with the Cosmological Constant, Λ.
- ΩR is the radiation density parameter of the Universe. It represents what fraction of the total energy density of the Universe is attributable to radiation.
The curvature parameter, ΩK is derived from these supplied parameters internally as ΩK = 1 - (ΩM + ΩΛ + ΩR). Most changes to these parameters will result in rather subtle visual effects - they will manifest primarily as changes to the comoving radial distance in a galaxy's Info Box. Curvatures that are very large in magnitude (|ΩK| >> 1) may result in more marked visual differences.
Program Performance
The Program Performance section contains one value that may be changed at runtime - the Cull Size. It sets the smallest size in pixels for which a galaxy's image will be displayed - if a galaxy's size is smaller than the Cull Size, the galaxy will be displayed as a single pixel of its averaged color. Modification of this value is provided as a way to adjust the speed at which the application runs. The most CPU-intensive task is resizing and displaying images, so by increasing the Cull Size you may decrease the number of displayed images and thus increase the speed of the simulation. Note that decreasing the Cull Size will provide better visuals but could potentially slow the application down significantly.
Back to Index
Configuration File and Advanced Options
In addition to runtime options in the Help and
Options Dialog, you may create or download an optional configuration
file to modify the application's default behavior. This file is simply a
specially formatted text file called ahah.conf that must be
placed in the same directory as ahah.jar. The options are
placed in the file as Key : Value pairs separated by a colon.
For example the line OmegaM : 0.237 sets
ΩM to 0.237, the currently accepted COBE/WMAP value.
Comments within the file are preceded by # and section
headings (optional) are placed in brackets, such as [Cosmology
Constants]. Keys other than those below will simply be ignored,
and giving a key an improper value (such as a floating point number
where an integer is required) will cause the application to print an
error and then use the default value. The available options are as
follows:
Application Operation Options
Options in this section change the default behaviors of how the application runs, including performance tweaks.
- FrameSleepTime is an
integerthat specifies the time in milliseconds to wait between redraws of the main simulation window. A shorter time will update the viewport more often, but be more taxing on the CPU. Modifying the default value may affect performance drastically. - MacroStepDelay is an
integerthat specifies the time in milliseconds to wait between steps of an automatic move (when double-clicking on a galaxy). A shorter time will result in smoother, faster movement - CullSize is an
integerthat specifies the default Cull Size, as discussed in the Options and Settings section above. This way if you have a particularly fast computer, you can force the application to use a smaller Cull Size every time you run it. Thus you would not have to open the Help and Options Dialog to change it every time. Note that modifying the value at runtime using the Help and Options Dialog will always override any value in the configuration file. - DefaultBrowser is a
stringrepresenting your preferred browser command on *nix systems. If you do not change the setting yourself, the application will try, in order:firefox,mozilla,opera,konqueror,epiphany,netscape. The value set in the configuration file is simply any shell command, so may be something in$PATHlikefirefox, or the full path such as/usr/local/share/firefox/firefox. On Windows and Mac OS, the operating system's default browser is always used, so modifying this setting will have no effect.
Cosmology Constants
Options in this section set the defaults for various cosmology constants. For more detailed explanations, see the descriptions for the parameters in the Options and Settings section above. Like the Cull Size, changing the values at runtime using the Help and Options Dialog will override settings in the configuration file.
- HNought is a
floating pointnumber that specifies the default value of the Hubble Constant, H0. - OmegaM is a
floating pointnumber that specifies the default value of the matter density parameter, ΩM. - OmegaV is a
floating pointnumber that specifies the default value of the vacuum energy density parameter, ΩΛ. - OmegaR is a
floating pointnumber that specifies the default value of the radiation density parameter, ΩR.
Dataset Information
Options in this section give the application information about the original image that the individual stamps come from, as well as specifying where to find the object database. Options from this section should generally not be changed by users - they are provided for future use of the application with different data.
- DBFile is a
stringrepresenting the path of the database file within the jar file. This should only be modified if the application is repackaged with different data. The file should be specified with the root of the path being the root of the jar file, not of the computer's filesystem. - ImageSizePx is an
integerspecifying the height and width of the original image in pixels. If for some reason the image is not square, use whichever dimension is larger. - ImageArcsecPerPx is a
floating pointnumber that specifies the arcsec/px scale of the original image. This is used internally for changing pixel sizes to angular sizes and vice versa. - MaxRedshift in an
integerthat specifies the maximum redshift for the distance tables. This need only be sufficiently large such that no object in the database has a higher redshift (as the program may then crash since it would not be able to correctly interpolate the object's distance).
Application Configuration Constants
Options in this section change aspects of the application that users generally do not need to modify, such as the locations of external resources like this documentation. These options are provided primarily as a convenience to website administrators in the event that urls change, etc.
- StampURLBase is a
stringthat specifies the directory containing the More Information html files for galaxies. The provided string must contain the trailing/. The application expects the html files within this directory to be namedn.html, wherenis the HUDF ID number of the object. - HelpURL is a
stringthat indicates the url of the application's online documentation, i.e. this page. - TextColor is a
hex codethat defines the color of the text on the Main Screen. The value is standard RGB hex encoding (like in HTML and CSS), i.e. RRGGBB. For instance a deep purple would be encoded asTextColor : 6633aa.
License, Source Code, and Modifications
The Appreciating Hubble at Hyper-speed application is provided under a BSD-like license. In simple terms, this means that virtually any modification or redistribution of the application is permitted, with the following caveats:
- Any redistribution must retain the original copyright notice and license file, either with the source code or with the documentation in the case of binary distributions.
- The names of the copyright holders, contributors, and associated institutions may not be used to endorse or promote any derivative works without prior permission.
Note that there is no requirement that source code be provided with any derivative work or redistribution. We encourage any derivative works to provide source code as well so that others may learn from your modifications, but we leave such decisions to your discretion.
Application Source Code
The application's source code is provided with the standard distribution.
Java archives are simply standard ZIP (DEFLATE) archives with a special
internal directory structure. Thus, you need only extract the contents
of the archive using your favorite ZIP extractor (Using jar
you would run jar -xf ahah.jar). The application
source code is contained in the src/ directory.
Warning: The ahah.jar file exhibits
"tarbomb" behavior, extracting to the current directory instead of its
own subdirectory. This is mostly a limitation of the jar format, since
the META-INF/ directory must always be in the archive
root. We strongly suggest you move the archive to its own
directory before extracting it.
To compile the source you simply need to run
javac *.java. The compiled binaries will automatically
be placed within the directory edu/asu/Ahah/. To run the
modified application you then need to create a new jar including the
directories edu/, images/, and
data/, as well as the files defaults.conf and
license.txt, and any source code if you desire. You also
need to specify a Manifest file, which must contain at least the line
Main-Class: edu.asu.Ahah.Ahah - this tells the Java
interpreter where to find the main class when a user runs the jar. An
example jar creation command is:
jar -cvfm ahah.jar MANIFEST.MF edu images data src defaults.conf
		license.txt