Process Color
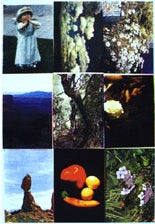
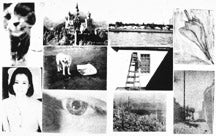
Collaborative Class Silkscreen, 1998
(all images are from Stephanie Hunder's Fall 98 and Spring 99 Color classes at Arizona State University.)
Studio Fundamentals: To learn to use computers as a tool for creating art,(Adobe PhotoShop, scanning) and print a four color/ silkscreen. To become familiar with process color printing, and understand the differences between CMYK and RGB color.
Concept: To gain experience in working as part of a collaborative team.
Working collaboratively, create a four color/ process silkscreen, using digitally produced color/ separations.
 |
 |
 |
 |
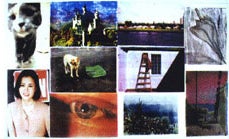
Collaborative Class Silkscreen, Sp. 1999
--ASU Core Web Site
--Adobe PhotoShop help screens for halftones and color/ separations
techniques: process color/, printer's (process) inks, color/ separations
spot (flat or match) color/, Pantone system
silkscreen, squeegee, registration, transparencies
computer scanner, printer, PhotoShop
concepts: graphic codes, pointillism, crosshatching, halftone screen, optical mixture, moiré pattern, rosette pattern, benday pattern
culture/science references: CMYK, RGB, CRT (cathode ray tube)
 |
 |
 |
 |
Image to scan, access to computer, printer and scanner.
Instructor should have access to silkscreening supplies
Preliminary:
Before coming to class, review the thematic concept of Collaboration as found on the website. Also read the discussion Media for Unit X. Review the Project References above.
Step One: Scan an image into a computer
These are specific instructions for Adobe Photoshop version 5.0 and Desk Scan at Arizon State University's Computer Commons classrooms. For other venues or programs, instructions may be slightly different. See Photoshop manual for newer versions.
- Place image in scanner
- In PhotoShop, go to File> Import > Twain Acquire. (The screen will show the Desk Scan II mode and do an automatic preview of your image)
In the Desk Scan menu:
- Choose Type (color Photo, Sharp color Photo, etc.--not halftone)
- Choose Path: PhotoShop / Laser Jet 4M (this will set the scanning resolution to 150 dpi for a photo image)
- Scaling: leave at 100% (change later if desired)
- Crop your image, if desired (see scaling measurements to help determine size)
- Select "Final"
Name your file and move it to a disk or the "shared space" on the desktop
With your partner, move to another computer in the room to complete next steps.
Step Two: Change image to CMYK color
If
you want to alter your image in PhotoShop,do it at this point.
The image has been scanned in
RGB color for general use on a computer, but we want to change it to CMYK
color for printing the silkscreen.
Open your file (this will also
open PhotoShop) from your disk or the shared space.
Go to Image > Mode > CMYK
color
Note the slight change in color go back and forth between modes to see
the change again. Not all colors possible with RGB are reproducible with
CMYK, and vice versa.
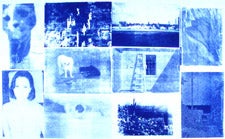
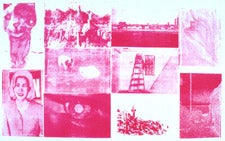
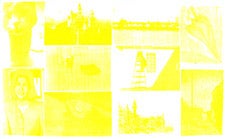
Step Three: Look at the color separations
In PhotoShop, it is possible to
look at the separations before we print them.
Select Window > Show Channels
In the small window that appears,
click on the names of the different channels (Cyan, Magenta, etc) to see
what they look like in black and white. Clicking to the left of the thumbnail
images will show you what different combinations look like in color/.
Play around and try different combinations.
 |
 |
 |
 |
 |
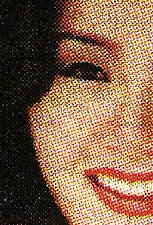
Step Four: Create Halftones
In order to print the image with
a silkscreen or other printing process, the image must have a halftone
or other graphic code.
Go to File > Page
Set up > PhotoShop 5.0.2
Select "Screen"
In the Screen window
that appears, un-click "Use Printer's Default Screens" and select your
desired attributes
Set "Frequency" to 80
l.p.i. for each color/
Set "Angle" to these settings: Cyan 105°
Magenta 75°
Yellow 90°
Black 45°
(For more information,
look under "Help">Help Contents, select "Find", type in "halftone"
and choose "About Halftones"this explains the angles)
Setting the halftones at an angle creates the "rosette" pattern below when using a regular halftone.

or the cross-hatching effect below when using a "line" halftone


Set "Shape" to a shape
that interests you make all color/s the same
shape (check box) or experiment (un-check box)

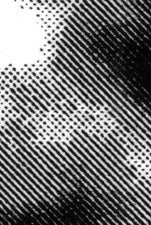
(regular halftone) ......("line" halftone)
Step Five: Print
Separations
Go to File > Print
Pull down "General" to "Adobe PhotoShop 5.0.2"
For "Space" choose "Separations" and hit "Print"
(make sure to keep track of which separation is which color/ they will
print in CMYK order, so label them when they come out)
or, as a challenge, mix them up and see if you can decipher which is
which...
Step Six: Create
Transparencies
Take to a copy shop and have your separations xeroxed onto a transparency
Bring to next class and tape up on registration sheets (these are four
larger transparencies lined up to a pin and tab registration system, one
for each color/. The students use clear tape to attach and line up each
of their separations on the appropriate sheet).
Step Seven: Print
(At this point, the instructor uses the large transparencies to create
four photographic silkscreen stencils. This should probably be done outside
of class, unless teaching that technique as well)
In class, print four color/ process silkscreen. This might be messy so
wear work clothes or bring an apron. (Instructor demonstrates, then each
student gets a piece of paper and prints their own copy)
Students learn primarily by hands-on involvement in this assignment, and also by magically seeing the optical mixing happen before their eyes.
Points to discuss might involve the following:
- What are the conceptual reasons behind creating multiples?
- What differences are there between smaller and larger images?
- Did everyone use the same shape of halftone (and how does that affect the final image)?
- What type of images work well for this technique (drawings, photographs, level of detail, original color/s)?
- Is the color/ reproduction accurate; were images registered correctly; were the color/ separations in the right order, etc?